Getting the Most from Your Lalia 16-20 Paper Flower Template
Paper flowers have become a staple in event decoration, home styling, and creative business. Among the many options available, the Lalia 16-20 Paper Flower Template stands out for its generous size range and realistic petal structure. If you are considering using this template for the first time, or if you have already tried it and felt the results did not match your expectations, you are not alone. Many people run into the same preventable issues. Let us walk through what this template offers, where people commonly go wrong, and how you can get consistently beautiful results without wasting time or materials.
What the Lalia 16-20 Paper Flower Template Actually Offers
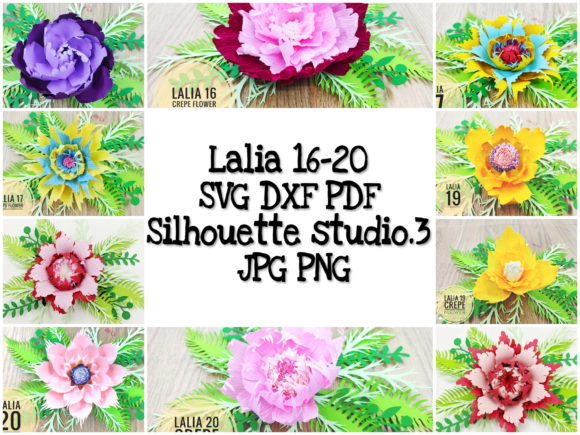
Before diving into mistakes, it helps to understand what you are working with. The Lalia 16-20 Paper Flower Template is a set of cut-and-assemble patterns designed to create large-scale paper blooms in the 16 to 20 inch range. This size is popular for statement walls, backdrops, photo props, and retail displays. The template typically includes multiple petal shapes, leaf patterns, and assembly guides that allow you to build flowers with layered, dimensional petals.
What makes this template appealing is not just the size but the versatility. You can use different paper types, adjust the curl of the petals, and mix colors to create custom looks. However, that same flexibility also opens the door to confusion. Without a clear approach, it is easy to end up with flowers that look flat, uneven, or flimsy.
Mistake One: Choosing the Wrong Paper Weight and Type
The single most common error people make with the Lalia 16-20 Paper Flower Template is picking the wrong paper. Because these flowers are large, the paper needs enough stiffness to hold the shape without collapsing. Many beginners reach for standard printer paper or lightweight cardstock, thinking it will work if they are careful. It will not. The petals will droop, the edges will curl unevenly, and the finished flower will look limp.
On the other side, some crafters go too heavy with thick cardboard or rigid board, which makes the petals difficult to shape and leaves the flower looking stiff and unnatural.
- What works well: Medium-weight cardstock in the 65 to 80 lb range is a reliable starting point. It holds a curl, cuts cleanly, and supports the structure of a 16-inch flower.
- What to test: If you want a softer look, try crepe paper or textured fine art paper. Just be aware that you may need to reinforce the base or use a lighter adhesive to avoid tearing.
- Double-sided vs single-sided paper: Since large flowers often show the back of the petals, double-sided paper or paper with a consistent color on both sides will give a more professional finish.
Before you cut an entire set of petals, make a single test petal from your chosen paper. Curl it, let it sit for a few minutes, and see how it holds. That small step will save you a lot of frustration.
Mistake Two: Skipping the Scale Check
The Lalia 16-20 Paper Flower Template is designed to produce flowers within a specific size range, but the exact final size depends on how you print, cut, and assemble the pieces. A common misunderstanding is assuming that simply printing at 100% will automatically give you a 16-inch flower. In reality, the final diameter is influenced by how tightly you overlap the petals, how many layers you include, and whether you adjust the template scaling.
If you are working with a specific space, such as a 3-foot backdrop or a wreath frame, you need to measure the finished flower before you commit to the full build. Print one set of petals, assemble a partial flower, and measure its diameter. You can then scale the template up or down in your print settings to hit your target size. This is especially important if you plan to group multiple flowers together and want consistent sizing.
- Tip for consistency: If you are making a batch of flowers, print all petals for every flower at the same scale. Even a 2% difference in print scaling becomes visible when flowers are placed side by side.
- Check your printer settings: Make sure "fit to page" or "scale to fit" is turned off unless you intend to resize. Many printers default to scaling, which can throw off the proportions of the petals.
Mistake Three: Overlooking the Assembly Order and Layering
One of the strengths of the Lalia 16-20 Paper Flower Template is the layered petal design that gives the flower depth. But if you assemble the layers in the wrong order, or if you attach all petals at the same angle, the flower will look flat and two-dimensional.
The template usually includes a recommended assembly sequence, and it matters. The inner petals need to be attached at a steeper angle, with more curl, to create the illusion of a natural bloom. Outer petals should be attached at a wider angle and curled less tightly. If you treat every petal the same way, you lose the dimensional contrast that makes large paper flowers look realistic.
Better approach: Before you glue anything, lay out all the petal pieces and mark which ones are inner, middle, and outer. Curl the inner petals more aggressively using a bone folder or the edge of a scissors blade. Curl the outer petals gently. Attach the inner petals first, working outward. This gradual change in angle and curl is what gives the flower its volume and lifelike appearance.
If you are using a hot glue gun, be mindful of the temperature. Hot glue can soften the paper and cause the curl to relax. Let the glue cool slightly before you press the petal into place, or use a low-temperature glue gun if your paper is lightweight.
Mistake Four: Neglecting the Base and Support Structure
A 16- to 20-inch paper flower has a lot of weight, especially when built with multiple layers and cardstock. The base where all petals attach must be sturdy enough to hold that weight without collapsing or wobbling. Many templates include a small circular base piece, and it is tempting to think that alone is enough. It is not.
If you attach heavy petals to a thin base, the whole flower will sag forward or the base will tear over time. This is especially problematic if you are creating flowers for a vertical display, such as a wall or photo backdrop, where gravity is working against you.
- Reinforcement: After attaching the base piece, add a second layer of cardstock or a thin piece of chipboard to the back. This doubles the strength without adding visible bulk.
- Stem or mount: If you plan to mount the flower on a stem, dowel, or wire, embed that support into the base before you attach the final layer of petals. Trying to add a stem later often damages the flower.
- For wall-mounted flowers: Attach a loop of ribbon or a wire hanger to the back base piece during assembly. Trying to glue a hanger onto a finished flower usually results in the glue pulling away from the paper.
Mistake Five: Rushing the Curling and Shaping Process
The Lalia 16-20 Paper Flower Template gives you a great starting shape, but the real magic happens in the shaping. Curling the petals is not a step you can rush through. If you curl each petal halfway or skip the shaping on the underside of the petal, the flower will look unfinished.
Take time to curl each petal intentionally. Use a stylus, bone folder, or even the back of a spoon to roll the edges outward. For the inner petals, you want a tight curl that cups the center. For the outer petals, a gentle wave or fold at the base of the petal helps it flare outward.
After curling, hold the petal in the shaped position for a few seconds so the paper "remembers" the curve. If the paper is particularly stiff, you can gently mist it with water and let it dry in the curled shape. This technique is especially useful for crepe paper or handmade paper.
One more detail that makes a difference: the back of the petal. Many people shape only the front face. But gently curling the back edges of the petal outward creates a more natural, cupped look that catches light better. It is a small extra step that elevates the result noticeably.
Mistake Six: Ignoring Color and Texture Coordination
Because the Lalia 16-20 Paper Flower Template yields large flowers, the color and texture of the paper become immediately prominent. A small mismatch that might be subtle on a 5-inch flower becomes obvious on a 20-inch bloom. This is where many DIY decorators and small business owners lose cohesion in their designs.
If you are making a single flower, this matters less. But if you are creating an arrangement or a backdrop, inconsistent color tones or mixed textures can make the display look chaotic. For example, pairing a bright white cardstock with a cream-colored accent paper creates a stark contrast that looks unintentional. Similarly, mixing glossy paper with matte or textured paper can work, but only if you plan it deliberately.
- Test before committing: Hold your chosen papers side by side in natural light. Fluorescent lighting in craft stores can distort colors. Check the papers together under the lighting where the flowers will be displayed.
- Consider ombre or gradient: Use a lighter shade for the inner petals and a darker shade for the outer petals. This adds depth and mimics how natural flowers fade toward the edges.
- Texture variety: If you mix textures, keep the color within the same tonal family. For instance, a matte base with a subtle shimmer accent on the outer petals can look intentional and elegant.
Mistake Seven: Not Testing the Assembly Flow Before Committing to a Batch
This mistake is especially common among small business owners and educators who plan to produce multiple flowers. The temptation is to cut all the petals at once, then assemble them all at once. But the assembly process often reveals small adjustments you wish you had made: a tighter curl here, a different glue angle there, a slightly smaller base.
Instead, build one complete prototype flower from start to finish. Use the same paper, same tools, and same techniques you plan to use for the rest of the batch. Note how long each step takes, which parts are tricky, and whether the final size matches your expectation. Adjust your process accordingly, then proceed with the batch. This single prototype step can cut your production time in half and dramatically improve consistency.
If you are teaching a workshop or creating a tutorial, the prototype also helps you anticipate where your students or viewers will struggle. You can then prepare tips, jigs, or alternative methods ahead of time.
What to Check Before You Buy or Download
If you have not yet purchased the Lalia 16-20 Paper Flower Template, there are a few things worth verifying to avoid disappointment. First, check the file format. Most templates come as PDF or SVG files. If you intend to use a cutting machine like a Cricut or Silhouette, make sure the template includes SVG or DXF layers and is compatible with your machine and software version. Some templates are designed for hand cutting only, and forcing them through a machine can lead to misaligned cuts or wasted material.
Second, check the license terms. If you plan to sell the finished flowers at craft fairs, online shops, or events, confirm that the template includes a commercial use license. Not all templates do. Using a template outside the allowed scope can create legal and ethical issues, especially if you grow your business later.
Third, read the reviews or look for photos of completed projects. Real-world examples from other users will show you how the template behaves with different papers and assembly methods. If most completed projects look similar, that is a good sign the template is reliable. If you see widely varying results, it may require more experimentation to get right.
Putting It All Together
The Lalia 16-20 Paper Flower Template is a versatile tool that can produce striking, professional-quality blooms when used with care. The most common pitfalls are not about the template itself but about the choices made around it: paper selection, scale verification, assembly order, support structure, shaping patience, color coordination, and batch planning. Each of these areas is something you can control and improve with a little forethought.
Start with a single test flower, take notes on what works, and refine your process from there. Whether you are decorating for a wedding, creating classroom projects, stocking an online shop, or building a portfolio, the time you invest in getting the details right will show in every finished piece. The template gives you the blueprint. Your materials, technique, and attention to detail turn that blueprint into something genuinely impressive.